Wednesday, November 23, 2011

M's Birthday Party Series: Lootbags


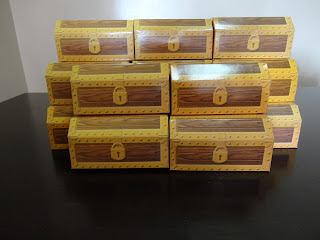
 Since my baby's party theme is Pirate, I gave out treasure chest lootboxes. Bought the boxes from Chocolate Lovers for Php 89 for pack of 10s. Then inside I placed treasure-themed items (well, at least majority of them):


- RING pops
- iced gems cookies (Gems = treasure)
- Goya gold coins and golden balls bought from Chocolate Lovers
- gold/orange colored candies like Butterfinger, TofiLuk, Orange swits
- silver foil covered goodies such as mallows and choco crunchies
- non-themed food items are pixy sticks and oreos

for non edilble items I placed the following
- bubbles (bought these from eBay. they are angry bird designs so I just covered them using my own design)
- mini yoyos from Toys R Us (these are actually Ben10 yoyos. I covered them with my own design)
- play doh

I over estimated the amount of candies I bought. I wasn't able to put alot since the box was a bit small. The excess chocolate coins and balls, I placed them around the cake. Instant candy bar for the kids during the party


Wednesday, November 9, 2011

M's Birthday Party Series: Passion Cooks

Ever since I've tasted Passion Cooks during a birthday party of a friend, I knew that once in my life I should try to get them for an event. Sadly, their packages are always out of my budget. Not that they are THAT expensive cause they are reasonably priced. There are other caterers that are far more expensive. Maybe it's all because my budget is THAT small. I considered getting them for M's baptism since my husband gave me a reasonable working budget. However, since I only had a little over a week to prepare, looking for a venue was next to impossible hence getting PC was out of the question.

For M's first birthday, I've considered other caterers but a nagging feeling told me to inquire with them and see if they can accommodate my budget. From the very start I told the ever affable Maja Martinez that I'm working on a very tight budget and would only want a simple merienda cena menu. This is a practical choice since my party is only for 2 hours (an hour of playtime and another hour for eating). She did not brushed me off and simply said she'll see what she can do. After the long holidays, her AE Melissa was the one who contacted me. She presented the proposal and with a few revisions, we came up with this final menu:


Classic Spaghetti Bolognese
Meat sauce served on a bed of spaghetti with a good sprinkling of grated Parmigiano cheese

Quiche Lorraine (Bacon and Mushroom / Mint and Spinach)
Eggless, and baked to perfection in a pastry crust

Wild Mushroom Vol-au-vent
Savory wild mushrooms stuffed in a small hollow case of puff pastry

Chicken and Ham Crepe
Chicken, Ham and Cheddar cheese, rolled up in a sweet crepe, topped with gravy Sauce

Panna Cotta
Topped with caramel or strawberry sauce


The initial proposal for the desserts were Cream Puffs and Gelatin shots. But I so love their Panna Cotta that I must have that during M's party. Besides, my Tita Joy of Big Al's Cookie Jar provided her best seller Decadent Chocolate Cake and Butter Cake. Desserts overload!

Days before the party I was afraid that the food might not be enough. I ended up ordering cupcakes and mini taisan cups from Shoppersville. Also on the day of the party, I ordered mini corn dogs from a store near Gymboree. Totally bad idea. The food provided by Passion Cooks was more than enough. We had so much leftovers. My mom, lola, cousin and brother brought home some. We also gave a lot to some friends and to the guards in our condo but we still find ourselves swimming in leftovers. Not that I complain cause the food is really good.

Melissa and her team came early to the venue. The waiters were very courteous and attentive to the guests. My only complaint though was the head waiter did not clear with me first if they can plug the water heater for the coffee. Well, I didn't know they will be serving coffee. So Gymboree charged me Php 500 as electricity charge. I had to force my husband and his friend to have coffee there instead of going to Starbucks just so my Php 500 won't go to waste. But other than that slip-up, Passion Cooks delivered excellent service.


If you're interested in getting Passion Cooks check passioncooks.multiply.com

M's Birthday Party Series: Invitations

After I got the Pirate Pocoyo images from my brother, I started working on the invitation. I was able to download a pirate digi-scrap kit from the internet. I used some of the elements to come up with this:


I mostly gave this out as e-vites (electronic invitation). But for those who received printed copies, they received theirs looking like this:


I made use some of my cupcake toppers to seal the envelopes. Double purpose! Cute eh?

M's Birthday Party Series: Theme

I have always wanted to a Pirate Themed birthday party. But hubby was not totally sold on to the idea because with the skulls and crossbones and the dark color scheme, it is not exactly a child-friendly theme. But I bargained that if I'm able to find a way to make it look lively, he should allow me to do a pirate themed party. 

First, I asked my brother to make me a pirate character based on Pocoyo. Why Pocoyo? Cause that's one of the very few cartoon characters M is familiar with. You see he rarely gets to watch tv. The only time he got a lot of tv time was when he hospitalized for a week last September for pneumonia. Yes, 2nd hospitalization for year 2011. Unlike when he was 3 months old, this time it was a lot harder to make him stay still. His IV was re-inserted so many times that I lost count. The only thing that can make him stay put was watching cartoons and Pocoyo was one of his favorites. Even now when you show him a picture of Pocoyo he suddenly gets excited. 

This was of our initial peg:

 
I asked my brother to make him look like a pirate and then change the candles from 100 to 1. He gave me this initial sketch for approval:


After I ok'd on the image, he started putting color into the image. It took some revisions before hubby and I both agreed to these two final images:
My brother got what I wanted


This one I used on my cupcake toppers


Cute eh? The kids' yayas (nannies) said the character looks a lot like M. What do you think?


M's Birthday Party Series

The little boy is turning 1 on the 17th and we're throwing a party for him on the November 20. We decided on having a small play party for him instead of doing a big party for two main reasons. First, we don't want him to get exposed to too many people. With his pneumonia scares this year, we're trying to limit his exposure. Second, we want to give him a party that we know he'll truly enjoy. Definitely, he will not remember his first birthday party but at least we know that he enjoyed it. And one thing he enjoys a lot now is Gymboree. Oh you just don't have any idea how much he loves Gymbo the Clown. So here's a quick rundown on how we are going to celebrate it. I'll go into details after the party:

Venue: Gymboree
Caterer:  Passion Cooks
Theme: Pirates
Invitations/Thank You cards: DIY
Cake: Les Sucreries (this I will still have to finalize)
Costume: Carter's Pirate Costume by Twinkle Toes (a multiply seller)
Lootbags: Treasure Chests; contents I still have to buy


I still have a million and one things to do for this party. Wish me luck!


Monday, November 7, 2011

Beer Can Chicken

Have you heard about Beer Can Chicken? Well I haven't until an expat friend told me over dinner to try this stall in the Saturday Salcedo Market. They sell what you call Beer Can Chicken and it's supposed to be sooo good. Well going to the Salcedo Saturday Market is out of the question (ummm, I usually wake up late on weekends). So with the help of Mr. Google I was able to replicate it. The one being sold in Salcedo is grilled but since I don't have the grilling space in the condo, I decided to bake it.

Things you'll need:

a whole chicken
half a can of beer (for my first try I used Red Horse)
salt
pepper
olive oil
whatever spices you use for your favorite baked chicken (I used dried rosemary and a little of chili powder)

1) Preheat your oven to 175 degrees C
2) Using a paper towel, pat dry your chicken. Make sure you remove the giblets inside the cavity.
3) In a small bowl, mix your oil, pepper, salt and spices. Rub this into your chicken as well inside the cavity
4) Now, insert the can into the chicken and place into an oven safe dish. It should look like this:


5) Bake for an hour to an hour and a half until it's no longer pink at the bone and the juices run clear.


6) Remove the beer can. Let the chicken rest for a bit before serving. 


According to the hubby the chicken is very tender and juicy. It has that distinct flavor of the beer but it's not overpowering. Next time I'll try using premium beers like the Guinness.


Tell me how yours turns out...


Sunday, November 6, 2011

Recipe: Mackarel Pesto Pasta

Sharing you my I'm-not-in-the-mood-to-cook recipe. At Php 150, this is good for 4-5 pax depending on your appetite


Mackarel Pesto Pasta

a can of mackarel (i usually buy Master or Ligo), remove brine/water and the bones of the fish - around Php 30 per can
Ideal Penne Pasta - around Php 50 per pack
half a pack of McCormick Pesto powder - around Php 30
3 pcs of tomatoes
a whole garlic chopped
a cup of olive oil (once when i ran out of olive oil, i used the regular vegetable oil i used for frying. i turned out ok)
a third to half a stick of butter
cheese cheese
small can of mushrooms (optional)
salt
pepper

1) cook you penne. make sure not to overcook it cause you will have to cook this again with the sauce
2) in a pan, put in you oil, garlic, tomatoes and pesto powder. For the pesto powder, I usually put a 3rd of a pack. You can always add more if you want. Make sure your heat is in the lowest setting. You will be cooking these slowly. Add your butter, mackarel and mushroom. Add salt and cracked black pepper to taste.
3) once your tomatoes are cooked, add your cheese.
4) Add in your pasta once the cheese has partially melted. You may add oil if you find it a bit dry.
5) Mix well. Served with bread sticks

Saturday, November 5, 2011

Mateo's Baptism

We initially planned to do M's baptism somewhere around April to coincide with my mother-in-law's visit from Europe. But after his scary pneumonia hospitalization during the first week of February, we decided to do it early. You know how superstitious the oldies are: that he got sick because he has not been baptized. So to pacify them and also to get the Church's blessing, we decided not to wait anymore for MIL. 

With just a a little over a week to prepare, I had to do away with the pomp and  decided to go with simple elegance. We decided to do it last March 12. Yes, a day after the infamous March 11 Japan Tsunami. (side kuwento/story: S was baptized a day after the October 19 Glorietta Bombing and believe it or not, I was there to pick up some baptismal giveaways. I was in Glorietta 4 but had to rush to SM Makati since all BDO atms in Glorietta were down. I was on my way back to Glorietta when I saw people running toward my direction yelling at me not to go there because there was a bomb. And with M's baptism happening a day after the Japan tsunami, my mom kept insisting it's a sign for me to repent and change my ways. Sometimes my mom can be too hard core. Lol!)

Busy Days Ahead

My apologies for the lack of posts. I've been busy these past few days. You see this Working Mommy No More is now a Working Mommy From Home. The offer is so hard to refuse. I'm on my trial period now so let's see how it goes. I work 8 hours a day from Mondays to Fridays. I'm still adjusting to the work schedule hence the lack of posts. Plus I'm starting to get busy already for little M's 1st birthday party. 

I have a post in draft now. Will share that with you soon. Hope you enjoy this another long holiday.

Thursday, October 27, 2011

My Pride and Joy


Aren't they cute? These were taken from The Picture Company months ago.


Wednesday, October 26, 2011

DIY Series: Personalized Apron

During S's 3rd birthday, she had a small school birthday party. I had a lot of plans but again budget was the issue. Unlike during S's 1st and 2nd birthday parties, when I was still working and had money to augment the paltry budget my CFO gave me, this time the "working mommy no more" had to be extra creative and resourceful on how to make the party special at the same time stick to my budget.

S and her classmate getting busy with the activity
Her school only allows simple parties in school so no games and program. But I wanted to add an activity aside from the usual eating and blowing the candles. I decided to do a cupcake decorating activity. The kids decorated cupcakes I ordered from Frupcakes using candies, sprinkles and fondant decorations while wearing these cute little aprons. I got the idea from The Loot Fairy. I initially wanted to order from them but they have a 24 pcs minimum order. It came to a point I was tempted to order all 24 thinking the rest I can give out as Christmas gifts. Tee hee! But at that moment, I did not have the money to order all 24 pieces. 

With no sewing skills, I tried asking my friend if her mom who dabbles in sewing can make the aprons for me. It was fairly easy to make so she asked me to send her the template and the materials. I'm sure your friendly neighborhood mananahi (seamstress) can do that for you.


Tuesday, October 25, 2011

DIY Party Series

I've been busy lately planning for the little boy's party. And I only have less than a month left. Yeah I know I'm cramming which is so unlike me. S's party was planned 7 months in advance. I initially had a hard time deciding where to do M's, whether to go big or intimate. So until I sorted that out just last weekend, I cannot go into the nitty gritty. Every waking hours now are spent on Photoshop and soon cutting and gluing papers.

Photo Credit: Psprint.com
One thing I love  to do for my kids' parties are the DIY projects (do-it-yourself projects). Aside from these are labor of love and add up personalized touches, it is a way for me to save money. You see the hubby is no believer of big parties. He grew up during the communist times in Europe where everything is rationed. Birthday means a homemade cake and a small salu-salo in the house. No fancy gifts and definitely no fancy parties. Which is so unlike Filipinos who throw big parties during the first and the seventh birthdays. During S's 1st birthday party he set up a budget which made think "Are you serious?" So while my mommy friends had the opportunity to hire party planners, I had to do everything own my own: from looking for a venue, making balloons (there are a lot of tutorials in YouTube) to making my invitations and other decors. 

It is very easy to do DIYs.  All you need is a little creativity and a lot of patience. But it is hard labor too. I know I'm exaggerating but have you tried sitting for 3 hours straight cutting small pieces of pictures for your paper tole invitations? You will also need  to do alot of researching. I usually get ideas from Marthe Stewart and Tip Junkie. Forums such as GirlTalk and Smart Parenting will give you ideas what's "in" in the birthday party scene in the Philippines.

One helpful tool I use is Photoshop. I learned using this during my Multimedia class in college (see Ms. E I did learn something from your class). After graduation, I totally forgot about it then was forced to re-learn it to make S's baptism invitation. I'm still no expert in this and I only know the basics. BUT I do think I'm able to make fantastic invitation layouts (I'll share some of it next time). Back to Photoshop, it takes sometime to learn the software but once you get the hang of it, using it is quite easy. However, if you don't have the time to learn a new software or do not have the intention on investing on buying the software, you can easily do your layouting in PowerPoint or in Paint. These have limited functionalities compared to Photoshop but it can help you accomplish the task.

From time to time, I'll be sharing my DIY Party ideas. Hopefully, you mommies who are planning parties for their kids will learn a thing or two from them.

Friday, October 21, 2011

Meet Mateo Nicolas

Meet Mateo Nicolas. He was born almost a year ago on November 17 weighing 7lbs 4 oz.


Unlike with his Ate (Big Sister), my labor was  fast (active labor was only over 2 hours). My EDD was supposed to be on November 27. We only stayed in the hospital for a day but it felt like we were there for weeks. You see S was in and out of the ER for fever, diarrhea and dehydration since November 12 and was finally admitted last November 15.

Monday, October 17, 2011

Recipes: Pork Kinamatisan

I came from a family who loves to cook. Almost every family reunion revolves around food. I remember my maternal Lolo (grandfather) waking up as early as 4 am on a Sunday to go to Farmer's Market to get the first dibs on the freshest produce. Then he'll slave away the whole morning to prepare the most sumptuous lunch. So you can just imagine his disappointment if we miss our Sunday reunions. It was almost as if you committed a mortal sin. 

I do not have any formal training in cooking. But I did get my Lolo's love for cooking. And over the years I have collected a lot of recipes - my own, family recipes and some I gotten off the internet and then tweaked a bit. From time to time, I'll be sharing some of these here. 

Pork Kinamatisan is my mom's recipe. I'm not sure where she got this but this has been a staple in our home. If you're a novice cook or if you don't like the prep work, this is the recipe for you. Pork Kinamatisan got it's name from one it's major ingredients - kamatis or tomato in Filipino. Hope you enjoy this!


Pork Kinamatisan

ingredients:


1 kilo Pork Ribs (if ribs are a bit expensive for you, you can use liempo)
6-8 pcs red tomatoes medium sized (cubed)
2-3 tablespoons of patis or fish sauce (you can adjust this to taste)
1-2pcs finger chilis (same thing you put in sinigang)

In a shallow pan, put in your ribs, tomatoes and patis. DO NOT PUT ANY WATER. Cover your pan and put it in a very low heat. You'll see that water will eventually come out of the tomatoes. Stir occasionally. Once your pork is tender, add you green chilis. Let it stand for 3-5minutes then turn off heat. Serve with fried eggplant and rice.

Sunday, October 16, 2011

A Year of No Word

After more than a year of severely neglecting this blog, I've decided to 'resurrect' it. I have realized I should more diligent in keeping track of things...starting with this blog!

So what have happened in a year?
In November, Sofia got hospitalized for dehydration. Then days after that, I gave birth to our baby boy Mateo (I'll be sharing my birthing story soon).

December became so hectic because of relatives' visiting from Canada. We also spent our first Christmas and New Year in our new home. 

Come summertime, my mother-in-law visited us from Europe. My daughter also attended theater school. Then, towards the end of summer, we decided to go out of town for some R & R. 
My daughter started with Nursery last June and again I've been busy with her school activities left and right. She also had a Princess party back in July, which almost did not push thru cause my Lola (grandmother) died a few days before the party. 

This was my year (and more) in a nutshell. I promise to tell you more about this next time.

LinkWithin

Related Posts with Thumbnails